How To Wire 3-Way Switch?

How To Wire 3-Way Switch?

Introduction : Welcome to our comprehensive guide on how to wire a 3-way switch, an essential skill for homeowners and DIY enthusiasts alike. A 3-way switch is a common component in many homes, allowing you to control a single light source from two different locations. This functionality is not just convenient but can also enhance the safety and accessibility of your home. However, working with electrical wiring demands caution and a clear understanding of the process to ensure safety and efficiency. In this article, we’ll take you through the steps of wiring a 3-way switch, emphasizing the importance of adhering to safety precautions.

How to
Wire a 3-way Switch

Introduction : Welcome to our comprehensive guide on how to wire a 3-way switch, an essential skill for homeowners and DIY enthusiasts alike. A 3-way switch is a common component in many homes, allowing you to control a single light source from two different locations. This functionality is not just convenient but can also enhance the safety and accessibility of your home. However, working with electrical wiring demands caution and a clear understanding of the process to ensure safety and efficiency. In this article, we’ll take you through the steps of wiring a 3-way switch, emphasizing the importance of adhering to safety precautions.
Remember, while DIY projects can be rewarding, they can also be complex and risky. It’s always best to consult with or hire a professional, like our experts at Ampere Electric, for more complicated tasks.

Basic Concepts

Before we dive into the wiring process, let’s clarify what a 3-way switch is and why it’s useful. A 3-way switch setup consists of two switches controlling a single light fixture or a series of light fixtures. This setup is ideal for large rooms, hallways, or staircases, where multiple switch points are convenient.
To get started, you’ll need a few tools and materials: wire strippers, a screwdriver, a voltage tester, electrical tape, and, of course, two 3-way switches and a light fixture. It’s also important to have wires of the correct gauge and type as per your local electrical codes.
Safety is paramount when working with electricity. Always turn off the power at the circuit breaker before starting any electrical work. Use a voltage tester to ensure that the power is indeed off. Wear safety gear like gloves and goggles for added protection. Keep in mind that incorrect wiring can lead to circuit shorts, appliance damage, or even fire hazards. Therefore, if you’re unsure about any part of the process, it’s wise to consult with a professional electrician.

In the next section, we’ll walk you through a step-by-step guide on wiring a 3-way switch. Stay tuned to turn on your DIY skills, safely and effectively!

Step-By-Step Guide To Wiring
A 3-Way Switch

Wiring a 3-way switch may seem daunting, but with the right tools and a step-by-step approach, it’s a task that can be accomplished by those with basic DIY skills. Remember, safety is paramount; if at any point you feel unsure, it’s best to consult with a professional electrician. Let’s break down the process:

Preparation & Safety Checks

Before beginning any work, ensure that the power to the circuit you’re working on is turned off at the breaker box. Use a voltage tester at the switch location to confirm that the power is indeed off. Gather all your tools and materials: two 3-way switches, wire strippers, a screwdriver, a voltage tester, electrical tape, and appropriate wires.

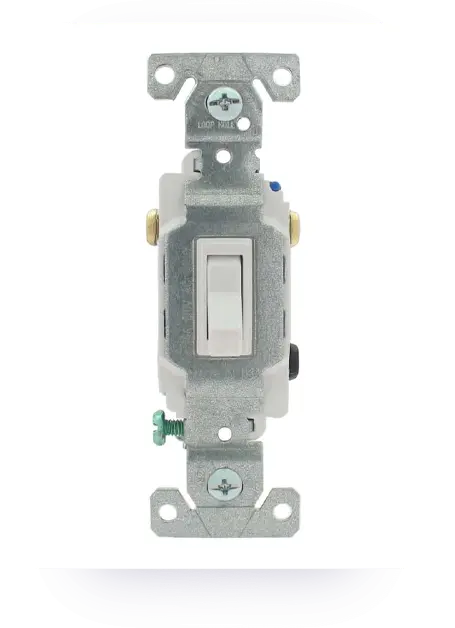
Understanding Wiring Diagrams

Familiarize yourself with the wiring diagram for a 3-way switch. A standard 3-way switch circuit involves two switches and one light fixture. Each switch has three terminals: one “common” terminal and two “traveler” terminals. The common terminal will be connected to either the power source (in the first switch) or the light fixture (in the second switch), while the traveler terminals will be connected to each other through
traveler wires.

Disconnecting The Old Switch

If replacing an existing switch, carefully remove the switch plate and unscrew the old switch from the box. Gently pull it out and use a voltage tester again to ensure there is no power. Note how the old switch is connected before removing the wires. If installing a new switch, ensure your wire runs from the power source to the first switch, then to the second switch, and finally to the light fixture.

Connecting The New 3-Way Switch

Start with the first switch. Connect the ground wire (usually green or bare copper) to the green grounding screw on the switch. Next, connect the power source wire (the “hot” wire, typically black or red) to the common terminal of the switch, which is usually a different color than the traveler terminals. Now, connect the two traveler wires (usually red and black) to the traveler terminals.
At the second switch, connect the ground wire to the grounding screw. Connect the wire leading to the light fixture to the common terminal. Finally, connect the traveler wires to the traveler terminals, ensuring they match the connections on the first switch.

Testing The Connection

Once everything is wired, carefully place the switches back into their boxes and secure them with screws. Don’t fully install the switch plates yet. Turn the power back on at the circuit breaker, and test the switches. Both switches should be able to independently control the light. If the circuit doesn’t work as expected, turn off the power and double-check your connections.
After successful testing, turn off the power again, securely fasten the switch plates, and then turn the power back on. Your 3-way switch installation is now complete!
This process requires patience and attention to detail. Remember, dealing with electrical wiring can be dangerous, and there’s no shame in seeking help from a professional if you’re not completely confident in doing it yourself. Safety should always come first.

Troubleshooting Common Issues

Even with careful installation, you might encounter some issues with your 3-way switch. Here are common problems and their potential solutions. If these troubleshooting steps don’t resolve the issue, it’s wise to consult a licensed electrician to ensure safety and proper functionality.
  • Switch Doesn’t Control the Light: If the switches don’t control the light at all, check the connections to the common terminal. The common wire may be connected to a traveler terminal instead.
  • One Switch Works, the Other Doesn’t: This problem usually indicates an issue with the traveler wires. Ensure that the traveler wires are connected properly to the corresponding traveler terminals on both switches.
  • Light Flickering or Unstable: Flickering can be caused by loose connections. Tighten all wire nuts and connections. If the problem persists, the issue might be with the light fixture itself or the wiring in the walls.
  • Circuit Breaker Tripping: This is a serious issue that suggests a short circuit. Immediately turn off power and inspect the wiring for any stripped wires touching each other or the metal switch box. If you can’t find the cause, a licensed electrician should be called to diagnose and fix the issue.

Remember, electricity is dangerous, and incorrect wiring can lead to fires or electrical shocks. When in doubt, always seek professional help from a licensed electrician to ensure your safety and the safety of your home.

Conclusion

Wiring a 3-way switch is a practical skill that can add convenience and functionality to your home. By following the steps outlined in this guide, you can successfully install a 3-way switch, understanding both its operation and the importance of each step in the process. However, always remember that working with electricity carries risks. Safety should be your top priority, and if you’re ever in doubt, don’t hesitate to reach out to professionals. Ampere Electric prides itself on providing expert advice and services for all your electrical needs.  

FAQs

A 3-way switch allows you to control a single light or a group of lights from two different locations, whereas a standard switch controls the lights from one location.

Basic electrical tools such as wire strippers, a screwdriver, and a voltage tester are sufficient. However, having a diagram and understanding the wiring layout is crucial.

Yes, 3-way switches are compatible with most light fixtures as long as the electrical circuit is appropriately configured for them.

Disclaimer

This guide is intended for informational purposes only and is not a substitute for professional advice or services. Electrical work can be hazardous and should only be performed by qualified individuals. Ampere Electric strongly recommends consulting with or hiring a licensed electrician for any electrical projects. The author and Ampere Electric are not liable for any damages or injuries resulting from the use of this information. Always adhere to local building codes and regulations when undertaking electrical work.

Recent Posts

How To Wire 3-Way Switch?

Introduction : Welcome to our comprehensive guide on how to wire a 3-way switch, an essential skill for homeowners and DIY enthusiasts alike. A 3-way switch is a common component in many homes, allowing you to control a single light source from two different locations. This functionality is not just convenient but can also enhance the safety and accessibility of your home. However, working with electrical wiring demands caution and a clear understanding of the process to ensure safety and efficiency. In this article, we’ll take you through the steps of wiring a 3-way switch, emphasizing the importance of adhering to safety precautions.

Read More